Pages

Showing posts with label free motion. Show all posts

Monday, August 3, 2015

Sampling bigger

Here I posted about my freemotion quilting samples. While making them I also created a mini quilt sampler.  


I'd sorted some hand dyed fabric that I'd purchased ages ago on Trademe (NZ's version of ebay) and had never used mostly because the fabric was quite flimsy and the colours a little light.  

For the initial piecing of the front used gentle curves then the back with straight piecing. Then the back became the front!  

For each segment a different quilting pattern was used with varying threads. 

back
closer look


One of my favourites is the fill in the slim white piece.


While I could keep this as a sample it is also the right size for a neonate quilt or maybe a large cushion.

Friday, July 17, 2015

Sampling

I've been practicing my freemotion quilting.  Previously when I've created practice/sample pieces they tended to be on scrappy fabric/batting or larger pieces.  

I've been looking for an efficient way to have a quick reference to refer to when deciding what designs to use on a quilt.  Often I find that I've used a quilting design then forgotten about it or can't quite remember what it looked like or how I did it.  

On Candy Glendening's website she shows how she created a freemotion quilting sampler book, with small quilt samples loosely bound together.  This is perfect for what I want to achieve.  

Here is my bundle so far ...


Candy used metal eyelets - my eyelet installing ability failed me so I resorted to using the eyelet stitch on my machine.  The size of the samples is ~9 1/2" square - the same size as one of my rulers.
 
Individual samples ...


On each sample I've recorded the type of thread, bobbin thread, needle, batting used and anything else useful.


As well as patterns I'm trying different needle types with a variety of threads.  I'm also interested in creating textures so will explore different battings and combinations.


Monday, June 29, 2015

SAQA Benefit Auction 2015

Every year SAQA holds a benefit auction where members can donate a 12x12" quilt.
While the auction starts in September, the quilts can be viewed on SAQA's website.  My 12x12" quilt 'Like Tapa' appears on page 5.

Like Tapa

For this years quilt I wanted to create the look of a tapa cloth using non-traditional materials.  

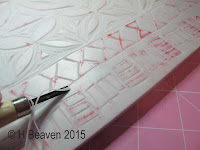
The first stage was to transfer my hand drawn design onto an Ezy carve printing block using Saral transfer paper. I've been using these blocks as I find them easier to carve into than the usual lino.  I haven't found them in NZ so whenever I go to Australia I buy a few more.  They come in a range of sizes, using the 12x12" size is perfect for this project.

design drawn on a piece of paper


initial cuts (red marks from transfer paper)
cutting more detail


cutting complete


adding another layer of colour

Creating the pattern by rubbing with Paintsicks.  


Pinning the fabric to the base helps prevent unwanted movement and ghosting of the image.


selecting thread for the handstitching

The flowers and the darker strip had an extra layer of batting to give a trapunto effect. The machine quilting was mostly done with co-ordinating thread around the shapes to emphasise the trapunto.


Videos have been made detailing the creating of some of the quilts, have a look here.


Friday, May 29, 2015

Knit One, Paint One, Repeat

My quilt 'Knit One, Paint One, Repeat' has been hanging at Nancy's Stitch Studio for a few weeks now.  It is mostly the same as 'Knit One, Paint One (see here) except the colour is less blue and slightly lighter to fit the colour scheme for their new shop.

Kint One, Paint One, Repeat

In March I posted about my initial progress with the quilt (see here).  

A couple of detail pictures ...


finished quilting
back view


It takes a bit of getting used to seeing the quilt when I enter the shop.  A nice feeling and now to remember to enjoy seeing it as it is and not thinking about what I could have done differently or better. 

Friday, May 15, 2015

More Ruler Work

I've continued playing with my Westalee rulers.  See here and here for previous posts.  

Note I've been using the Westalee ruler foot and not the freemotion foot that comes with my sewing machine.

Trying the set of 4 feathers rulers ranging from 2" to 5".

While you could just pick up these rulers and use them I found watching (and sometimes rewatching) the Westalee video sped up the learning process quite a bit.  


No marking of the individual feathers is required however having a basting line or marking straight lines on either side of the feathers helps to keep the feathers uniform and straight.

Straight line of feathers using one sized ruler.


Wavy line with different sized feathers using a combination of rulers


Attempting curved cross-hatching using the Westalee straight and curved ruler.

 
I'm getting used to the edge of the ruler not being where the stitching line will be but 1/4" in from that.  This catches me out when I'm getting to the end of a shape and need to line the ruler up - it is too easy to line the edge of the ruler up with the point, start sewing then realise you're not going to end in the right place! 

Still working on getting the stitch length even and better start/stops ...

Monday, April 20, 2015

Ruler Work

Back here I posted about using the Westalee foot and rulers for freemotion quilting on a domestic sewing machine.  

I've been trying the Westalee 'Circles on quilts - wreath 16' ruler.  At the narrow end of the ruler there is a pin hole, a drawing pin is inserted from the back of the quilt and the ruler is placed on the pin.  One segment/shape is stitched then the ruler pivoted so the next segment can be sewn.  Finally joining up in a wreath shape.


ruler, centre pin
stitching


What I learnt:
* stabilise the area to be quilted first by stitching in the ditch.  Basting with safety pins isn't a good idea as the pins get in the way and the ruler doesn't cope with them nearby or underneath. 

stabilising in the ditch


* extra flat space is required so either use the sewing machine in a table such as a Sewezi or an extension table for the machine.  Having a reasonable amount of flat space is needed.  

* use the Supreme Freemotion slider as the under side of the drawing pin will get caught between the machine and the insert thingy.
slider on my sew ezi table


* the screw on the foot does need to be tight - interesting things happen if it comes undone.

* if there are any whoopsies stop and unpick.  If you keep going it probably won't meet up at the end leaving the wrong sized space for the final segment. 

* check that there is enough space on the quilt for the completed pattern before starting to stitch.   I didn't do this and was stitching across the batting. 


oops


This did have a happy ending as I realised that the pattern was quite interesting so stitched over the unpicked shapes but within the star.
partial stitching
 

I then needed to repeat this on the other star and realised that I could stitch until I reached the outline stitching of the star, backtrack, turn the ruler stitch the next segment.


Now to fill in the rest of the space and work on getting the stitch length even ... 


See here for Westalee's video for using this foot.  


Friday, March 20, 2015

Wannabe Longarmer

Recently I've been reading blogs about using rulers, that longarm quilters use, for freemotion quilting on a domestic sewing machine.  

It was clear that using the freemotion (darning) foot and an ordinary quilting ruler wasn't going to work.  I'd read enough that I wasn't even tempted to try and see if I could get it to work.

The blog I keep going back to is Amy's Freemotion Quilting Adventures in one post (here) she talked about using a combination of Janome feet on a Bernina.  I thought there must be an easier way.  

And there is .. an Australian company Westalee Design has designed a foot and rulers for domestic sewing machines.  After watching their video, I ordered the foot and ruler and a week later it arrived. 

Westalee foot and ruler


For the foot to work on my Bernina 440 a Bernina 'low shank adaptor foot' is required, which I already have. Following their great instructions, attached the foot and was off ...
 
... had a bit of a play ...


Then onto a mini neonates quilt.  While I could have achieved the same result with a walking foot, it was a great trial.  

using Aurifil 50wt thread


I found it easier to hold the ruler when it was on the left handside of the foot.   On the righthand side it tended to move abit - probably as I'm left handed. Would also help it I stuck on the non-slip strip that came with the ruler!

So now more practice and experimentation, although this will need to wait until I've finished my knitted quilt.