Pages

Showing posts with label Silhouette Cameo. Show all posts

Tuesday, November 24, 2015

Snug as a bug

My sort of Christmas themed neonate mini quilt ...


I have a lot of white narrow strips of fabric, mostly left over from trimming quilts.  So started playing with a selection of red, orange and lime green fabrics cut into smallish squares with even smaller white squares on opposite corners like this ...

After sewing what seemed to be a rather lot of squares with even more to go to make a 27" square quilt something was needed in the middle.

The something was a ladybug, although here in New Zealand we call these ladybirds.

The fabric had fusible ironed on and then cut on my Silhouetto Cameo cutting machine.  

The shapes and letters were fused on to a square of white fabric that had another layer of fabric to help stabilise the applique.  


Using a straight stitch, stitched around the letters 3-4 times.  The bug has a mixture of straight stitching and blanket stitch.


There was one false start ...

When I cut fused shapes I've been placing the fabric side down on to the sticky carrier mat as I've found it is easier to peel the pieces off and it seems to cut better.


Using the mirror image is a bit more useful.


Final layout.  

I kept the quilting simple with cross hatching around the bug and the words.  Each white square was quilted in the ditch, while a little bit time consuming the end result is what I wanted.




Tuesday, September 8, 2015

Know when to stop or not

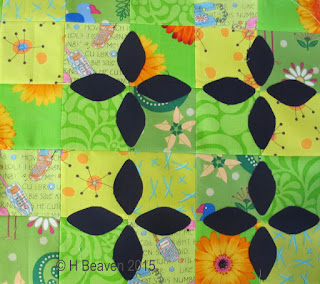
A few days ago I decided to work on a quick and easy project - a neonate quilt.  I'd seen a picture of a pieced quilt using an orange peel/petal design.   


My version was to piece the background and then applique the petal shapes on top.  


Piecing the 3" squares went well, I was happy with the applique shape I'd designed using the Silhouette software.  


 Next step - quick and easy to cut the pieces out on the Silhouette Cameo ...


 ...  a little while later I had nicely cut and fused shapes that only needed the paper removed before ironing to the top.   


In the hours between there were a few mishaps.

first problem - my original Silhouette mat had lost much of its stick as I discovered after carefully adhereing (or so I thought) the fused fabric (minus the backing paper).  


While the Silhouette did a brilliant job of munging most of the shapes, I did manage to retrieve a small number of shapes to use.

Now it would have been sensible to watch the cutting and stop it sooner!  


next problem - when I ordered the Silhouette I also received 2 cutting mats (not Silhouette brand) that can be used with any brand of cutting machine.  The cover sheet for the Silhouette mat is shiny on one side and matt on the other with both sides sort of plasticised so they easily peel off the sticky mat.  What I learnt with the other mat is that one side of its cover sheet is paper - as I peeled it away from the mat it managed to flip back onto the sticky mat and did not peel off! 

Perhaps this was a sign to stop, but no, I continued and used the second cutting mat.  Carefully putting on the fused fabric.  Now new mats are super sticky and the fusible pretty much became one with the sticky surface.  


I managed to retrieve a few fused shapes.  Mostly the fusible stayed with the mat and not the fabric.


At this point I almost gave up, instead decided a bit of research might be helpful - like watching youtube videos on cleaning mats and working with fusibles.

 
The recommended method of using painters tape to remove stray items from the mat and to restore the 'stickyness' works well with the Silhouette mat.  Just didn't work with the paper and fusible infused cutting mats.  


So they got a wash with warm soapy water and a high-tech scraper - an old credit card.  
After this I was off.


Successful cutting of a 12" x 12" piece of fused fabric.


Cutting smaller pieces of fabric is easy - the grid in the Silhouette software matches the grid on the mat making it obvious which shapes to remove or deselect in the software.  

From the videos I'd learnt to keep the fusible backing paper on and have the fabric sticking to the mat.  Also to select the thicker fabric (canvas) cutting option.  


What this meant was that the shapes lift out perfectly and they didn't roll the paper did.  It did mean a bit of time pulling off the paper from each shape.  


While not relevant to this project the same applies to stabilising fabric with freezer paper,  when cutting put the fabric against the sticky mat with the freezer paper on top. 

Presumably using freezer paper and the fusible paper will blunt the 'fabric' blades faster - not a big problem when you get a way better cut.

Meanwhile the quilt is progressing ...

Friday, August 14, 2015

Creating Stencils

For most of my quilts I've used freezer paper stencils with textile paint, paintsticks or oil pastels.  Some designs I've drawn or traced then cut with a blade.  While I've become quite accurate with my cutting it takes time and is difficult to get precise small pieces.

Earlier in the year, after some research, I purchased a Silhouette Cameo.  With the combination of the Silhouette software and the magic little blade my world of cutting freezer paper has become way bigger.

For my current project I wanted to repeat the technique that I used in my quilt 'Out My Window' using freezer paper stencils with paintsticks applied over the painted background (the swirls).


'Out My Window' detail

The Silhouette Cameo uses a 12"x12" carrier mat, whatever is to be cut is 'stuck' to the mat and feeds into the machine and the design is cut.  


trimming freezer paper to fit the mat
smoothing the freezer paper to the sticky mat


After a bit of use the mat looses its stick.  To 'clean' the mat a quick way is to lay down printers tape then remove the tape - this returns some of the stickiness and removes all the stray pieces of paper or whatever else has been cut previously.


This is my first mat - still working well despite the interesting cut patterns.

Using the Silhouette software the design is created then 'sent' to the machine for cutting. I'll explain a bit more about the Silhouette software in a later post.

completed cutting

 
slightly better view of cut images


The cut pieces easily peel off ready to be used ...

Thursday, July 2, 2015

Almost a Quilt

My daughter's hockey coach recently had a baby girl.  I was asked to make a polar fleece blanket from the team. 

Completed blanket

After wandering the aisles of Spotlight a navy blue and a light blue spotted fabric were chosen - even though we knew it was a girl.  The plan was to have hearts on one side and mostly the spotted fabric with the team name on the other side - instead of attempting to use each girl's name.

The 15 girls were asked to draw a heart that was a similar size to their hand - interpreted in a range of sizes.  

Cutting the pattern for the letters was made heaps easier with my new Silhouette Cameo cutter.  Choose a font, size, type in the words, load the paper, push a button and out come the pattern pieces for each letter.  Way easier and faster than getting the right font size, printing then cutting out each piece with scissors or a blade.

Testing layout with paper pattern and trialling fabric options.


The pattern pieces were pinned to the fleece and cut out.  As fleece moves alot I firmly tacked each heart before sewing them.
layout assistant

The blanket was presented to the family the day after the baby was born - not bad considering she arrived a week or so early.


other side of completed blanket