Pages

Showing posts with label how-to. Show all posts

Saturday, December 19, 2015

Fabric twine placemats

My playing with fabric twine progressed to an actual project.  I had a metre or so of a darkish batik that had been bought as a backing fabric, yet it had never found the right quilt.

It was ripped it into ~1inch wide strips along with three lighter batiks.  An easy project to pick up and quickly a reasonable amount of cord has been produced.  

The idea was to create placemats as a Christmas present, after working out how much fabric and effort was required to make 8-10 placements - the intended recipient has a large table, I settled on placemats that could be used in the centre of the table.  

As I wanted an oval shape I started with two longer strips before starting to go round and round.  

The peg held the pieces together until the stitching had started and prevented the twine unravelling.


Going round and round ...


 ... almost done.  

It would have been easier to have the mat on the left of the needle!


Three completed placemats that are mostly the same size and shape.

Either side can be used, I had black in the bobbin and a variegated polyester on the top.

Friday, December 11, 2015

Christmas decorations

Our Christmas tree has a rather eclectic collection of decorations from handmade to purchased. 


Felted balls with added beads, see here for instructions by Judy Coates Perez.

These are super easy and fun to make.


Hand crafted decorations from stitching friends


Felted hearts

Two pieces of acrylic felt decorated then blanket-stitched together with a small amount of stuffing.  

Some have had other fibres, including sparkly angelina fibres, needlefelted onto the felt before stitching.


Tuesday, December 8, 2015

Plodding along

Not alot of quilting is happening at the moment.  

I have finished the handstitching on a project that I've been taking along to my evening  stitching groups.  Now what to do with it?


Machine quilted wide spaced curving lines, also some bobbin work.   

Then 'coloured in' with hand stitching using a range of threads and stitches.  

Inspired by the work of Carol Ann Waugh.


 a closer look


 a few threads


The reason why there hasn't been any quilting is that I've been sewing a formal dress for my daughter. 

It has taken some time as I've been over cautious, with good reason as there have been expensive sewing failures in my past.  I've been so tempted to work on other things but have persevered. The deadline is Friday, just the hem and a button to sew on plus a bit of thread trimming.

Tuesday, November 24, 2015

Snug as a bug

My sort of Christmas themed neonate mini quilt ...


I have a lot of white narrow strips of fabric, mostly left over from trimming quilts.  So started playing with a selection of red, orange and lime green fabrics cut into smallish squares with even smaller white squares on opposite corners like this ...

After sewing what seemed to be a rather lot of squares with even more to go to make a 27" square quilt something was needed in the middle.

The something was a ladybug, although here in New Zealand we call these ladybirds.

The fabric had fusible ironed on and then cut on my Silhouetto Cameo cutting machine.  

The shapes and letters were fused on to a square of white fabric that had another layer of fabric to help stabilise the applique.  


Using a straight stitch, stitched around the letters 3-4 times.  The bug has a mixture of straight stitching and blanket stitch.


There was one false start ...

When I cut fused shapes I've been placing the fabric side down on to the sticky carrier mat as I've found it is easier to peel the pieces off and it seems to cut better.


Using the mirror image is a bit more useful.


Final layout.  

I kept the quilting simple with cross hatching around the bug and the words.  Each white square was quilted in the ditch, while a little bit time consuming the end result is what I wanted.


Tuesday, November 17, 2015

Playing with Fabric Twine

Recently a friend demonstrated how to make fabric twine.  I watched but didn't pay too much attention ... a couple of days later happened (!) to come across instructions (see here, includes a video) and had a play.

A few pieces of abandoned hand dyed fabrics ripped into roughly one inch strips ...


... and rather too quickly had a large ball of twine.


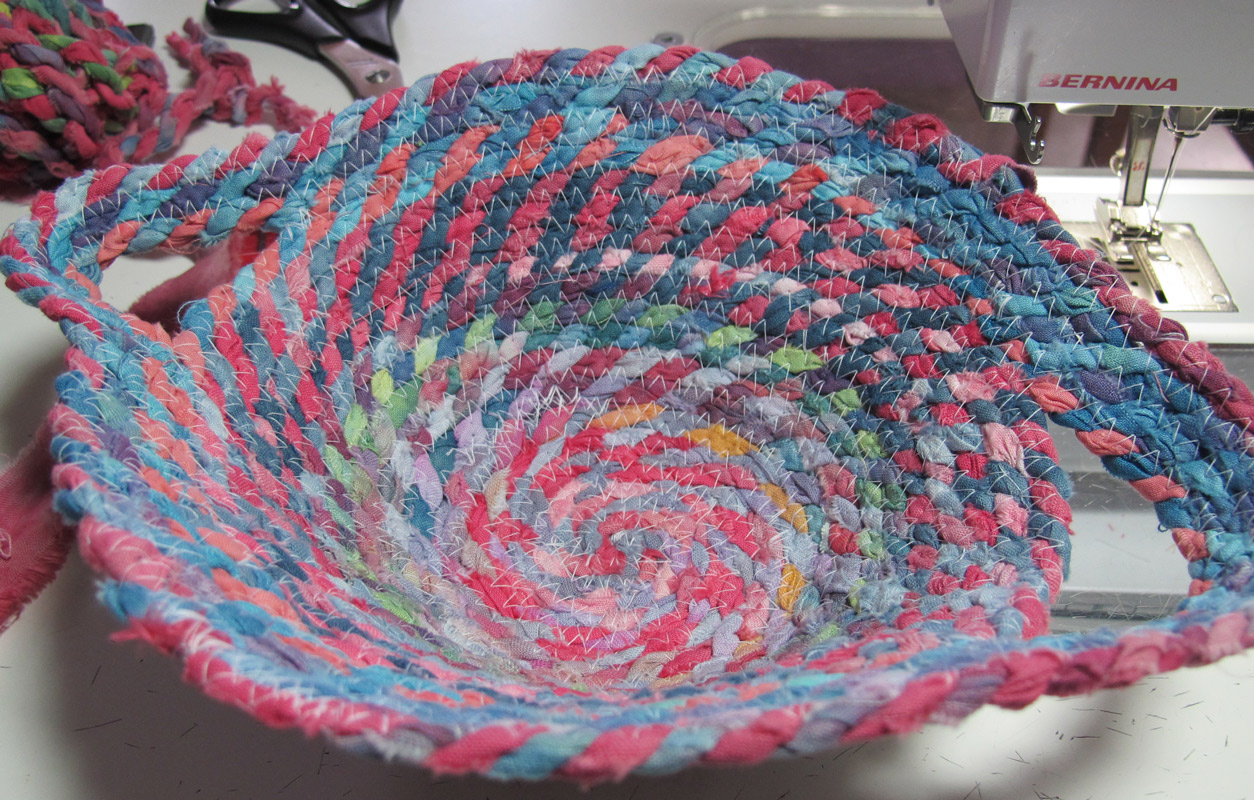
Days later had whipped up a bowl.


How the bowl was created ...
 
Using a wide and long zigzag sewed the strips together in a circular shape.  I used a large jeans needle (100/16) that sewed easily through all the layers.


To start the bowl shape, tilted the piece as I sewed.


To add a handle, held the twine away from the edge for a couple of centimetres, stitched and then rejoined on the other side and continued stitching.  

The trick is to evenly place the handle on the other side.


To shape the base, use a similar sized dish and iron the base and the edge.  The ironing flattens the twine and seems to hold the shape quite well.


Now on to the next project, this time with a more controlled colour scheme.

Tuesday, November 3, 2015

A bit of doodling

I have a colouring in book that is full of lovely designs that, for some reason, I can't bring myself to colour.  It does have some great designs for quilting, etc. 

So instead I've created my own colouring pages.  During our recent holiday I took along an A5 sketch book, black gel pen, selection of Inktense pencils and a brush for a bit of doodling.

 
First effort, coloured with Inktense pencils then brushed over with a moist brush.  

To avoid the colours running into each other, I did one colour at a time, left to dry before wetting the next colour.


 Next effort, this time just brushing over in one go.


water still to be applied 


A selection of pages to be coloured.  


  Next to try on fabric.

Sunday, October 4, 2015

A bit of the same

Last year I made a banner for my daughter's hockey team.  This year she is in a different team so another banner was needed.


My plan was to make this years banner bigger.  Off I went to Pete's Emporium to hopefully buy the same fabric as last year.  One of the things about Pete's Emporium is that the stock changes - there was no yellow/gold or black like I'd used last year.  There was a stronger/thicker yellow and a small piece (less than 1m) of black.  The amount of black dictated the size of the banner - similar size to last year ~1m x ~1.5m. 

Using the no-pin technique with my current favourite for a range of quilting uses - blue painters tape.  

The words are printed in Word and are about 500 point.  


Freemotion quilted around each letter three times.  Way easier than trying to manoeuvre the weight of the material around all those curves and corners.


Removing the paper (well most of it).

The next step is to carefully cut away the black to reveal the yellow lettering - reverse applique.


Repeating the process for the Wellington Hockey emblem. 

To complete the banner, stitched the black to the yellow, added a full size peice of yellow to the back, then added the eyelets - one banner.


The banner has had one outing with another one soon.

Sunday, September 13, 2015

Green Orange Peel

A few days ago I posted here about starting a new quilt and the issues with cutting the applique shapes.  

The applique shapes have all been ironed on.  I didn't have enought fabric to cut enough shapes to cover the whole quilt mostly because of the number of abandoned shapes.  

I quite like the final pattern.


Once the shapes were ironed I was about to start appliquing by machine each piece.  Then thought how was I going to quilt it?


The answer - applique and quilt all at once.  So the top was basted and stitched with blanket stitch.  

To eliminate the stops/restarts, I started at a point blanket, stitched to the next point, changed to straight stitch, stitched to the next point, changed to blanket stitch, and repeated.


My Bernina has a feature that allows easy switching between two stitches without having to reset the stitch settings each time.  I increased the width and length of the blanket stitch from the default setting. I also used the walking foot.

For the squares with no shapes, the quilting was straight line and repeated the petal shapes. 

Now it just needs a bit of a trim and the binding sewn on.

Tuesday, September 8, 2015

Know when to stop or not

A few days ago I decided to work on a quick and easy project - a neonate quilt.  I'd seen a picture of a pieced quilt using an orange peel/petal design.   


My version was to piece the background and then applique the petal shapes on top.  


Piecing the 3" squares went well, I was happy with the applique shape I'd designed using the Silhouette software.  


 Next step - quick and easy to cut the pieces out on the Silhouette Cameo ...


 ...  a little while later I had nicely cut and fused shapes that only needed the paper removed before ironing to the top.   


In the hours between there were a few mishaps.

first problem - my original Silhouette mat had lost much of its stick as I discovered after carefully adhereing (or so I thought) the fused fabric (minus the backing paper).  


While the Silhouette did a brilliant job of munging most of the shapes, I did manage to retrieve a small number of shapes to use.

Now it would have been sensible to watch the cutting and stop it sooner!  


next problem - when I ordered the Silhouette I also received 2 cutting mats (not Silhouette brand) that can be used with any brand of cutting machine.  The cover sheet for the Silhouette mat is shiny on one side and matt on the other with both sides sort of plasticised so they easily peel off the sticky mat.  What I learnt with the other mat is that one side of its cover sheet is paper - as I peeled it away from the mat it managed to flip back onto the sticky mat and did not peel off! 

Perhaps this was a sign to stop, but no, I continued and used the second cutting mat.  Carefully putting on the fused fabric.  Now new mats are super sticky and the fusible pretty much became one with the sticky surface.  


I managed to retrieve a few fused shapes.  Mostly the fusible stayed with the mat and not the fabric.


At this point I almost gave up, instead decided a bit of research might be helpful - like watching youtube videos on cleaning mats and working with fusibles.

 
The recommended method of using painters tape to remove stray items from the mat and to restore the 'stickyness' works well with the Silhouette mat.  Just didn't work with the paper and fusible infused cutting mats.  


So they got a wash with warm soapy water and a high-tech scraper - an old credit card.  
After this I was off.


Successful cutting of a 12" x 12" piece of fused fabric.


Cutting smaller pieces of fabric is easy - the grid in the Silhouette software matches the grid on the mat making it obvious which shapes to remove or deselect in the software.  

From the videos I'd learnt to keep the fusible backing paper on and have the fabric sticking to the mat.  Also to select the thicker fabric (canvas) cutting option.  


What this meant was that the shapes lift out perfectly and they didn't roll the paper did.  It did mean a bit of time pulling off the paper from each shape.  


While not relevant to this project the same applies to stabilising fabric with freezer paper,  when cutting put the fabric against the sticky mat with the freezer paper on top. 

Presumably using freezer paper and the fusible paper will blunt the 'fabric' blades faster - not a big problem when you get a way better cut.

Meanwhile the quilt is progressing ...

Tuesday, July 28, 2015

A quilting event

On Saturday the Wellington Quilters Guild hosted the 'Coast to Coast' quilting event.  The five Wellington region quilting guilds usually have a quilting event every two years.  

It was held at Wellington Girls' College and there were merchants, show and tell, jelly roll competition, speaker and three challenges.

My entries for the challenges:

Cat not included
Flag - to redesign our New Zealand flag.

Bloke's block - circle of jandals
All the blocks will be joined into a quilt/s and donated to the Wellington City Mission.

Child's block - noughts and crosses on blackboard fabric
All these blocks will be put together as a quilt/s and donated to the Women's Refuge.


I won first prize and viewers choice for my flag.  Hmm there were only three entries!  My prize included a New Zealand flag and a voucher from Sawmillers Quiltery which I redeemed for some Aurifil thread.  

The flag was created with freezer paper stencils and coloured with paintsticks, textile paint would have been easier and faster.  To get the colour more intense required quite a few applications fortunately we had a few sunny days.  I find the paintsticks a bit messy for using inside. 
paintsticks, freezer paper (white)

Selection of the challenge block entries ...
 

 kids blocks


blokes blocks


Interesting to see the final quilts.